Why spend money on expensive pond filters when you can make your very own DIY filter for your koi pond at home? There are many different DIY plans to choose from when it comes to making your pond filter and most of these methods require affordable items that you might even already have around your home.
If you have an outdoor pond for koi, part of the challenge to maintaining a beautiful pond is keeping the water crystal clear enough to see the koi swimming through the water. Most commercial pond filters are overpriced and require a lot of maintenance, which can take the joy out of keeping a successful koi pond.
With a little bit of patience and lots of creativity, you can create a pond filter for your koi that is the right size for your pond, has a unique appearance, and most importantly, works efficiently to keep your koi pond clean and filtered.

The 10 DIY Koi Pond Filters
1. Storage Tub Filter
| Materials: | Large storage tub, foam sheets, plastic piping, pump |
| Tools: | Carving tool, scissors |
| Difficulty: | Beginner |
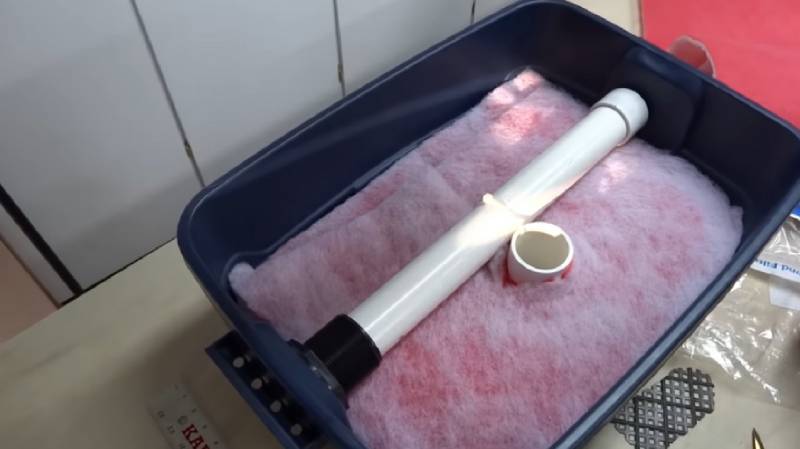
This filter is inexpensive, and the foam sheets can be purchased from your local pet store near the pond section. You may already have a large unused storage tub lying around which will form the basis of the filter and hold the media inside. You’ll need to carve two separate holes at the top of one side to connect the plumbing system so it can be connected to your pond.
This plan offers mechanical and biological filtration, as the foam sheets will trap in dirt and debris that would otherwise cloud your pond, while also providing a large surface area for nitrifying bacteria to grow.
2. Hose Pipe & Tub Filter
| Materials: | Large storage tub, piping, hose pipe, pump |
| Tools: | Carving tool |
| Difficulty: | Intermediate |
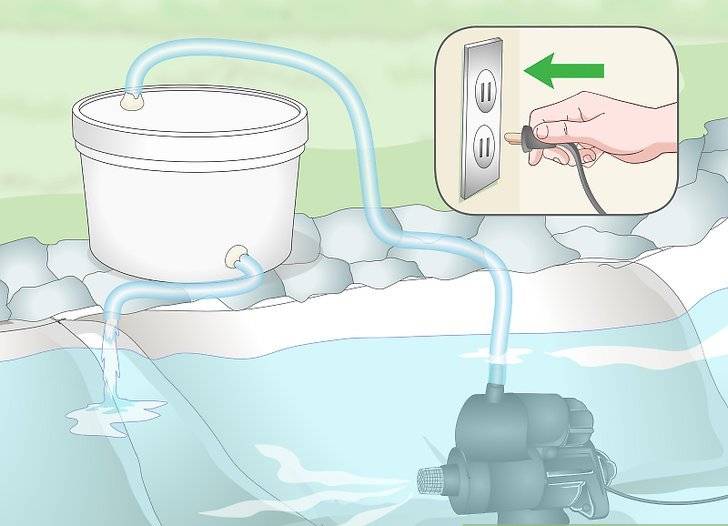
This filtration plan is slightly more complicated but very effective at running a good filter system through your pond. You will need to find a good placement to run the hose pipe through the tub to create a flow. Stones can be placed inside the tub to weigh the tub down, and you also can grow plants in the stones to make the filter look more attractive. If you do add plants to the top, they will use the nitrates from the pond water to grow, creating a balanced aquaponic system. The irrigation pipes can be purchased from your local hardware store and bolted into the large tub.
3. Bucket Method
| Materials: | Bucket, lid, pipes |
| Tools: | Carving tool |
| Difficulty: | Beginner |
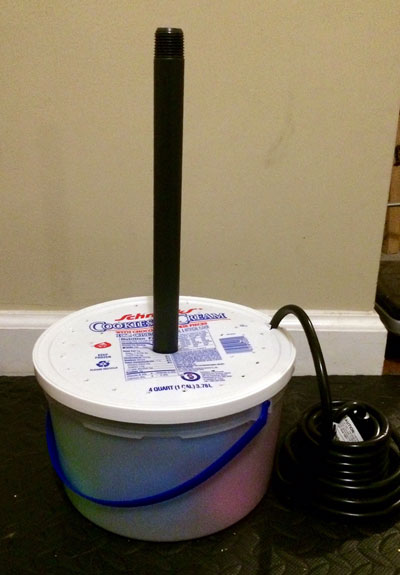
This is a simple DIY pump ideal for beginners. One pipe is connected to the top of the bucket where it will flow inside the bucket and through the filter media you choose to put inside and then filtered back into the pond. This is a good idea for small ponds, and the size of the bucket will depend on the size of your koi pond, so you can be creative with what you choose to put into the bucket and the size and color option you choose.
4. Sponge Pond Filter
| Materials: | Tub, dish sponges, long narrow tube |
| Tools: | Carving tool |
| Difficulty: | Beginner |
This is a beginner-friendly DIY koi pond filter for small ponds. The logistics are simple to understand and not much work is required to make this filter work. All you will need is a round tub with a lid, which can be found in your home or purchased from a store, and tubing which will go through a hole carved in the middle of the lid.
The main type of filtration for this system is from the dish sponges which should be filled in the tub. This is a great way to biologically filter your koi pond because the sponges provide a breeding ground for beneficial bacteria.
5. Low-Effort, High-Efficiency Swirl Filter
| Materials Needed: | Bucket, lid, trash can/basket, PVC pipes and connects, sponges, scrubbers, rocks |
| Tools Needed: | Electric drill + hole saw bit, electric sander, rubber mallet, scissors |
| Difficulty Level: | Beginner/Intermediate |
Worried that a standard filter won’t be able to keep the pond clean for your koi? That won’t be a problem with this low-effort, high-efficiency swirl filter. It’s a very simple DIY project that puts Dollar Store sponges, scrubbers, and foam to good use. Get your hands on a 5-gallon bucket with a lid, a trash basket, and some PVC pipes with fittings, and you can start putting the filter together. As for the tools, you’ll need an electric drill with a hole saw bit and an electric sander.
You can, of course, use a piece of sandpaper and a knife, but that will take a lot more time. Begin by drilling two holes in the bucket for the pipes, put the trash can at the bottom, and cover it with water-absorbing sponges. Follow the instructions closely to achieve the swirl effect, and don’t forget to add some rocks and close the filter with a lid!
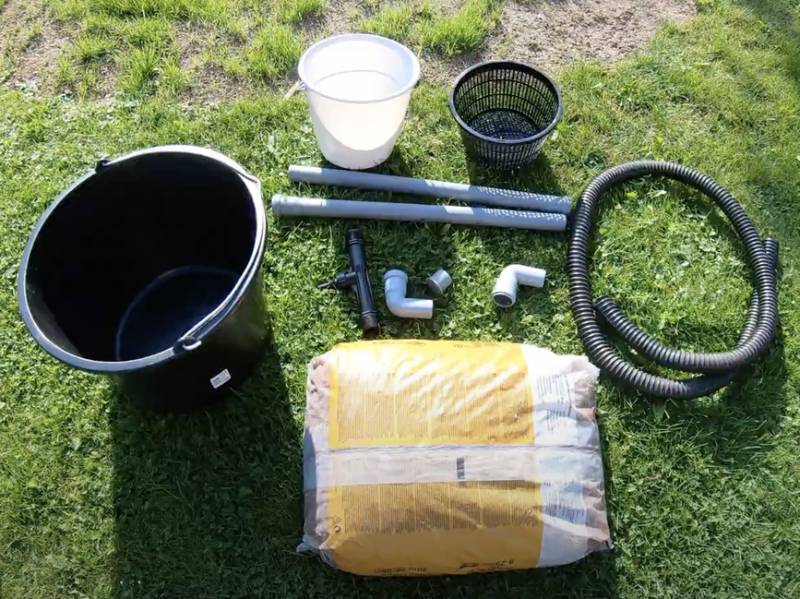
6. Cheap, Quick-To-Build Pond Filter
| Materials Needed: | Two buckets/tubs, plastic lid, PVC pipes, elbow, epoxy, stones, fishing net |
| Tools Needed: | Handsaw, utility knife, marker, steel rod, gloves |
| Difficulty Level: | Beginner |
If you’re on a tight budget yet still need the water to stay nice and clean, you can opt for a cheap, quick-to-build pond filter. This time, we won’t use a drill to make holes or sandpaper to smooth out the cuts. Instead, use a heated steel rod to turn the buckets into an improvised sieve and seal the opening with epoxy. A utility knife and a handsaw will come in handy for cutting out the bigger holes.
And what about the media—should you go with sponges or rocks? Well, why not try to filter the water with a pack of stones and some fishing nets? For maximum filtering efficiency, the stones should differ in shape and size. The best thing about this DIY project is that you don’t have to be surgical with the cuts. If the pipes fit and the water runs smoothly, that means the filter is working!
7. Trash Can Koi Pond Filter
| Materials Needed: | Trash cans, small bucket, bulkhead adapters, plastic pipes, connectors |
| Tools Needed: | Electric drill + hole saw bits, jigsaw, pencil, tape measure |
| Difficulty Level: | Beginner/Intermediate |
Here, we have another affordable DIY plan that you can easily bring to life with a couple of garbage cans, a small bucket, and some PVC. This trash can koi pond filter does a decent job of keeping a relatively big pond clean of waste, chemicals, and debris. Cut the pipe with a jigsaw, drill holes with a hole saw bit, and use tank bulkhead adapters (Uniseal) to ensure a snug fit. This way, the water won’t be able to escape and ruin your garden.
It won’t be easy to get the fittings and connectors through the cans and adapters, though; so, be patient! Also, before you do any cutting, use a tape measure and pencil to mark the spots. And one more thing: make sure the second trash can sits at least 5–10 inches lower than the first one; otherwise, the water will have a hard time traveling through the filter and into the pond.
8. Stacked Containers DIY Pond Filter
| Materials Needed: | Containers (3), tray, PVC pipes, fittings, Japanese filter mat, bio media blocks, ceramic rings, foam sponges, brushes |
| Tools Needed: | Electric drill, hole saw, hacksaw, pipe cutter, monkey pliers, scissors |
| Difficulty Level: | Beginner/Intermediate |
Don’t have any spare plastic buckets? Don’t worry; you can always build this stacked containers DIY pond filter! Thanks to the clever, universal design, it can be installed both indoors and outdoors. To add to that, industrial containers cost next to nothing, which makes this a low-budget project. The pipes and fittings won’t cost much, easier. Moving on to the filters, a Japanese mat and a bunch of bio blocks will be able to keep a large pond clean.
To make the filter even more effective, add some ceramic rings, brushes, and sponges into the mix. You’ll need quite a few PVC elbows and tank connectors to make this filter work. But, again, they’re very affordable and don’t require pro-grade skills to install. Besides, the concept isn’t that different from all the other DIY plans: we make holes, put the pipes through, and cover the containers with filter media.
9. Solar-Powered Koi Pond Filter
| Materials Needed: | Buckets (5- and 1-gallon), basket, waterproof box, pipes, elbows, aerator, hose, bilge pump, solar panel, controller, BMS, batteries, lava rocks |
| Tools Needed: | Scissors, utility knife, electric drill with bits, rubber gloves |
| Difficulty Level: | Intermediate |
Professional filters do a great job of removing debris and waste, but they also cost a fortune. But, if you build this solar-powered koi pond filter, you’ll get roughly the same performance while paying significantly less. We already covered several projects that are centered on buckets, pipes, and elbows. With an electric drill, scissors, and a sharp enough knife, you should be able to have the filter ready in 1–2 hours.
As for the solar panels, they aren’t that hard to set up. To “feed” the bilge pump, you’ll need a pair of panels (12V), a charge controller, a BMS system, and a battery pack (three in total). Follow the instructions closely to make sure the solar panels generate enough power to charge the filter. To protect the batteries, put them in a waterproof box. Finishing up, add a bag of lava rocks into the bucket.
10. Three-Stage Filter for Large Ponds

| Materials Needed: | Plastic barrels (3 in total), PVC pipes, fittings, washers, lava rocks, plastic media balls, K1 filter media, glue |
| Tools Needed: | Electric drill + hole saw, bit, hand saw, utility knife, measuring tape, marker/pencil, sander |
| Difficulty Level: | Intermediate/Hard |
Lastly, let’s check out this three-stage filter for large ponds. As the name suggests, it was specifically designed for a large school of koi fish. Thanks to the advanced filtering system, it can easily handle bigger-than-average ponds and keep the water crystal-clear. Ideally, the barrels should be rated at 15 gallons, but you can use whatever containers you’ve got. Here’s how the filter works: the first barrel will dispose of the larger chunks of dirt.
The second one is there to remove the smaller waste particles. Pack it with a generous amount of K1 filter media, lava rock, and bio balls. As for the third container, mixing K1 with air stones yields the best results. You’ll need quite a few PVC pipes, tanks, bends, and elbows for this project as well. Also, see that there’s a drop off in water levels. For that, put the middle barrel on a 4-inch “pedestal”; double the step up for the third one (eight inches).

What’s the Point of Filters? Can Fish Do Without Them?
A filter is mandatory if you have a relatively big pond with lots of fish. Without it, the water will get polluted in the blink of an eye, which is bad news for your aquatic friends. Fish waste, ammonia nitrate, rotten plants, debris, and even food that the koi don’t eat will, eventually, make the water in the pond dangerously dirty. But a decent-quality filter will be able to keep the pollution levels down and oxygenate the water.
Mechanical and biological filtration: that’s how filters deal with dirt and waste. That said, folks with a smaller bond and only a handful of fish might not necessarily need to filter it. This is especially true if the pond has a roof (or, at least, the owners clean the debris regularly) and some beneficial live plants. Hornwort, water iris, soft rush, and water mint are just some of the plants that can both filter and oxygenate ponds.
How Much Do Commercial Pond Filters Cost?
This greatly depends on the size, water volume, filtration type/stages, and brand. Ease of installation and maintenance affect the price as well. On average, a solid pond filter will set you back $120–$150. Some of the more expensive options cost up to $250 or even more. Filters aren’t cheap! That’s precisely why building a DIY device makes sense. True, it might not be as effective as some of the commercial units.
But the fish will still benefit from it greatly. Koi fish need the water to be clean, balanced, and aerated to survive, and you can provide that with a DIY filter. You don’t have to be a pro carpenter to put together a filter. If you have a drill, saw, and pair of scissors, you can get it done! Material-wise, some old buckets, pipes, and rocks/sponges are more than enough to get you started on one of the projects from the list.


Final Thoughts
There are so many creative ways to make a DIY koi pond filter! The type of filter you choose should be easy for you to create and install while providing enough filtration for the size of your koi pond. If you are struggling to keep your pond clean because debris and leaves are falling into the pond, then you’ll want to choose a DIY filter that has netting or foam sheets to catch this debris. If you have a small pond, then a small return valve filter may be a good option for you.
See Also:
- Using Activated Carbon in Aquariums: How Long Does It Last?
- 5 DIY Sump Filter You Can Create Today (With Pictures)
Featured Image Credit: NatalieStamer, Pixabay